With the use of WebSockets via Django channels, managing the communications between the client and the server, an event will be broadcasted to every other user connected to the channel layer. Each user’s page will be updated in real-time without reloading the page.
Detailed Tutorial is on the Youtube
NOTE: We recommend that you have some experience with Django before beginning this tutorial. Also, you should be familiar with the concept of WebSockets.
What we will be doing in this tutorial?
- We will fetch jokes from an API and display these jokes in the template
- We will schedule a Celery task to fetch jokes from an API every 3 seconds
- With the use of Django Channels, we will broadcast these jokes in real-time.
Applications Uses
- Django
- Django-channels
- Celery
- Redis
Let’s Begin
Create a new Django Project and set up the basic configurations in the settings file.
Add channels to the registered apps and also make sure you have a Redis server setup.
#Add ASGI application(File used by django channels)ASGI_APPLICATION = 'your_project.asgi.application'# CHANNELS SETTINGSCHANNEL_LAYERS = {"default": {"BACKEND": "channels_redis.core.RedisChannelLayer","CONFIG": {"hosts": [("localhost", 6379)],},},}# CELERY TASK STUFFBROKER_URL = 'redis://127.0.0.1:6379'CELERY_RESULT_BACKEND = 'redis://127.0.0.1:6379'CELERY_ACCEPT_CONTENT = ['application/json']CELERY_TASK_SERIALIZER = 'json'CELERY_RESULT_SERIALIZER = 'json'CELERY_TIMEZONE = 'UTC'
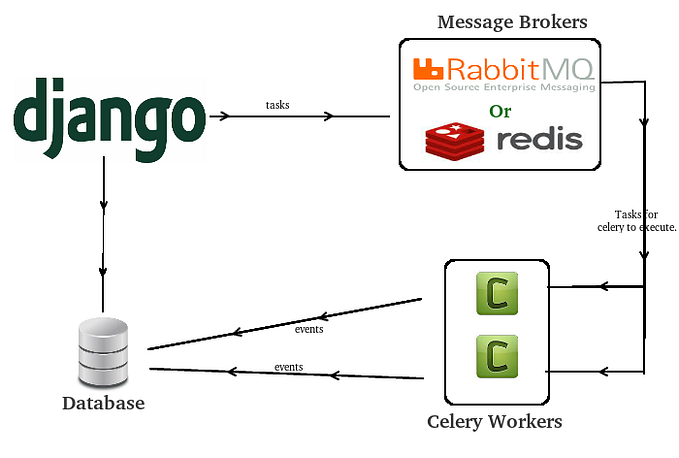
So the basic settings are all done, now let's get started with Celery.
Create celery.py file inside the project directory and add this code.
from __future__ import absolute_importimport osfrom celery import Celeryfrom django.conf import settings# set the default Django settings module for the 'celery' program.os.environ.setdefault('DJANGO_SETTINGS_MODULE',
'your_project.settings')app = Celery('your_project')# Using a string here means the worker will not have to# pickle the object when using Windows.app.config_from_object('django.conf:settings')app.autodiscover_tasks(lambda: settings.INSTALLED_APPS)app.conf.beat_schedule = {'get_joke_3s': {'task': 'joke.tasks.get_joke_data','schedule': 3.0}}@app.task(bind=True)def debug_task(self):    print('Request: {0!r}'.format(self.request))
Now create a tasks.py file inside the app directory.
#tasks.py
from asgiref.sync import async_to_syncfrom channels.layers import get_channel_layerfrom celery.decorators import periodic_task, taskfrom celery.task.schedules import crontabfrom celery import shared_taskimport requestsfrom celery.utils.log import get_task_loggerlogger = get_task_logger('__name__')channel_layer = get_channel_layer()@shared_taskdef get_joke_data():    raw_data = requests.get('http://api.icndb.com/jokes/random/').json()   joke = raw_data['value']['joke']   async_to_sync(channel_layer.group_send)(    'joke',   {       'type': 'send_joke',       'text': joke   } )
Also, Make sure that you registered your celery app in __init__.py(Project directory)
#__init__.py
from __future__ import absolute_import, unicode_literalsfrom .celery import app as celery_app__all__ = ('celery_app',)
Now create a consumers.py file inside the app directory.
Consumers are the counterpart to Django views. Any user connecting to our app will be added to the “users” group and will receive messages sent by the server.
#consumers.py
from channels.generic.websocket import AsyncWebsocketConsumerfrom asgiref.sync import sync_to_asyncimport jsonclass GetJokeConsumer(AsyncWebsocketConsumer): async def connect(self):   self.room_group_name = 'joke'   await self.channel_layer.group_add(   self.room_group_name,   self.channel_name  )    await self.accept()
 async def disconnect(self, code):   await self.channel_layer.group_discard(   self.room_group_name,   self.channel_name  )  async def send_joke(self, event):    text_message = event['text']    await self.send(text_data=text_message)
Now last but not least add this consumer to the routing file or for this article we will not create a different file for the route, instead, we will use the asgi.py file.
import osfrom django.urls import pathfrom django.core.asgi import get_asgi_applicationfrom channels.auth import AuthMiddlewareStackfrom channels.routing import URLRouter, ProtocolTypeRouterfrom joke.consumers import GetJokeConsumeros.environ.setdefault('DJANGO_SETTINGS_MODULE', 'channel_joke.settings')application = get_asgi_application()wspatterns = [ path('ws/joke/', GetJokeConsumer),]application = ProtocolTypeRouter({ 'websocket': AuthMiddlewareStack( URLRouter( wspatterns ) )})
Now just render your Django views and add WebSocket support via javascript
#jokes.js
<script>const joke_container = document.getElementById('jokes');const socket = new WebSocket('ws://'+ window.location.host+ '/ws/'+ 'joke/');socket.onopen = function (e) {     console.log("Connection Made");}socket.onclose = function (e) {    console.log('Connection Closed');}socket.onmessage = function (e) {      joke_container.innerHTML = e.data;}</script>
And that’s it, that’s all you have to do to get started with a real-time web app
For Detailed Tutorial Watch Youtube video.
Cheers!!!
Happy Coding.